Roof Leaking? What to Do Now, Temporary Fixes & Repair Costs

A leaking roof is a highly stressful home emergency.
It can potentially cause tens of thousands of pounds of damage and put your safety at risk.
And if your home insurance doesn’t cover it, you might have to foot the bill as well as live in discomfort until repairs are made.
What to do in the first 30 minutes
1. Contain the water
If water leaks into the loft, place containers on the loft floor above the ceiling joists (the horizontal wooden beams that support your ceiling).
Check these containers regularly whilst rain continues. Full ones can spill and collapse the plasterboard below.
2. Protect the room below
Move furniture, electrical items, and valuables away from the leak. Lay down thick towels, heavy blankets, or plastic sheeting across the flooring.
3. Relieve ceiling water pressure (if needed)
If water gathers behind the plasterboard, the ceiling can sag and form a bulge.
So, if this happens, puncture the centre of the bulge with a screwdriver to drain the standing water (into a bucket).
Draining the bulge intentionally prevents the ceiling from collapsing under the weight of accumulated water.
4. Turn off nearby electricity
If water drips near light fittings, wall sockets, or junction boxes, isolate the electricity at your consumer unit (fuse box) immediately. Don’t touch wet switches or electrical appliances.
5. Stay off the roof
Never climb onto a wet roof during a storm or rainstorm. External inspections and repairs are extremely hazardous.
How to make a temporary roof repair
Fixing a leak from inside the loft
⚠️ Safety note:
Only step on the ceiling joists themselves. Insulation hides gaps between joists, which can’t always support a human’s weight. Most lofts have no proper lighting, so use a torch (preferably a head torch). Lay a plank or loft board across joists if you need room to kneel or move. And do not touch cables running across the joists or elsewhere.
First, locate the leak entry point. Trace the water trail up to where it enters the roof lining. (Water often travels along roof rafters before dripping onto the ceiling.)
Look for damp timber, discoloured felt, or light showing through a gap. Mark the spot with chalk or tape.
Next, apply a temporary seal. Press self-adhesive roofing repair tape or flashing tape directly over the entry gap on the underside of the roofing felt.
For small nail holes or torn felt, press waterproofing sealant or mastic compound into the gap to divert water away from interior timber.
Fixing a leak from outside
⚠️ Safety note:
Falls from height cause more workplace fatalities than any other single hazard. Roof work alone accounts for around a quarter of all fatal falls in construction. Never climb onto a roof alone, in high wind, in frost, or on a roof that’s still wet or drying. Use a secured, correctly angled ladder (never a freestanding one leant against guttering) and tell someone else you’re up there. If you’re not completely confident, this is a job for a professional.
For pitched roofs, securing a heavy-duty waterproof tarpaulin over the damaged area is the standard temporary measure.
Drape the tarpaulin over the ridge of the roof so rainwater sheds naturally. Secure the edges with sandbags or heavy timber. Never nail or screw through a tarpaulin into your roof tiles, as this creates new leak paths.
For flat roofs, sweep away standing water and clear fallen leaves.
Apply a thick layer of rubberised roof repair compound or silicone sealant spray directly over visible cracks, split seams, or blistered felt.
Whilst flat roofs have a slight pitch (usually ten degrees or less) to shed water, standing water can linger and degrade temporary patches quickly.
Keep all receipts for temporary repair materials, tarpaulins, and emergency call-out fees. If you file an insurance claim, your insurer may reimburse these containment costs.
Roof leak repair costs
Understanding typical UK repair prices helps you budget effectively and evaluate quotes from contractors.
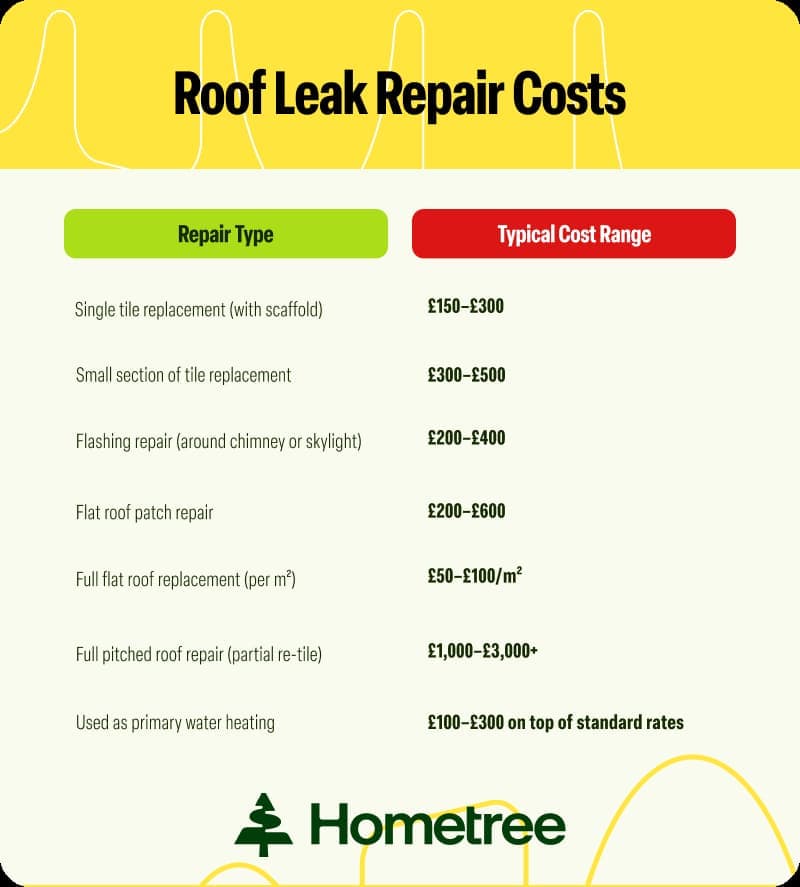
Scaffolding adds £600 to £1,200 to any repair on a pitched roof that requires safe edge protection and working platforms.
Small tile fixes on lower levels may only require tower scaffolding or roof ladders, but high or multi-storey repairs mandate full independent scaffolding.
Repair costs vary depending on your:
- Region
- Roof’s height
- Roof’s accessibility
- Material choices.
Replacing traditional mineral felt on a flat roof costs less upfront (£50 to £70 per square metre).
Installing durable EPDM synthetic rubber (a resilient rubber membrane with a lifespan of up to 50 years) costs £80 to £100 per square metre.
If a storm or other sudden accident removes tiles on a well-maintained roof, your buildings insurance policy will usually cover the repair cost (minus your policy excess).
Emergency roofer vs waiting: how to decide
Emergency roofers provide an out-of-hours response. But they charge a call-out surcharge of £100 to £300 above standard labour rates.
Call an emergency roofer immediately if:
- Water from the leak can’t be contained
- Roof timbers are visibly bowing
- The ceiling sags heavily under water weight
- The leak is near electrical panels.
However, if your internal temporary repair is working, or you’re able to capture all of the leaking water in a bucket you can consider waiting.
This saves you significant call-out surcharges whilst allowing contractors time to provide written quotes.
How to find and vet a roofer
Avoid hiring unvetted contractors or responding to cold-call door-knockers after severe weather events.
Start by searching for members of the NFRC (National Federation of Roofing Contractors), the primary trade association for UK roofing).
When requesting estimates, keep the following in mind:
- Get at least two written quotes that itemise labour, materials, waste disposal, and scaffolding costs explicitly.
- Confirm whether the roofer provides a written guarantee for their repair work.
- Don’t pay the total balance upfront. A deposit of 10% to 25% for materials is standard industry practice. The final payment is due upon satisfactory completion.
If you file a claim through your home insurance provider, they will usually assign an approved contractor from their network.
Check your insurance before you pay for permanent repairs
Further reading
Before arranging permanent repairs, check your buildings insurance terms.
Insurance policies cover damage caused by sudden, unforeseen events such as storm winds, fallen trees, or lightning strikes.
They exclude damage caused by gradual wear and tear, aged materials, or neglected guttering.
Contact your insurer’s claims department before approving permanent work.
The insurer will assign a loss adjuster (an independent specialist who investigates property damage) to inspect the roof.
Carrying out permanent alterations before this inspection can complicate or invalidate your claim.
For a detailed breakdown of policy exclusions and claims procedures, read our guide on whether home insurance covers roof damage.
What to do if your chimney leaks
Water appearing around a chimney stack does not always mean your main roof structure has failed.
Chimneys intersect the roof line and represent a common leak origin during driving rain.
Common chimney leak causes include the following issues:
Failed flashing
Flashing (the metal strips, usually lead, that seal the joint where the chimney meets roof tiles) expands and contracts with temperature changes.
Over time, lead flashing corrodes, loosens, or cracks.
Repointing or replacing chimney flashing costs £200 to £400.
Deteriorated mortar pointing
Mortar joints between chimney bricks erode due to frost and weathering. Water seeps through these porous gaps and runs down into the loft.
Repointing chimney brickwork costs £300 to £600.
Cracked chimney pot or cowl
A cracked pot or missing cowl (a protective cap fitted over the chimney top) allows rain to fall straight down the flue, causing damp patches on internal chimney breasts.
Replacing a pot or cap costs £100 to £250.
Damaged stack veneer
Decorative brick or stone facing on a chimney stack can crack or separate, allowing water to collect behind the surface.
If your chimney leaks during heavy rain, place a bucket beneath the loft inspection point and apply temporary flashing tape around the internal joint.
Once this has contained the leak, arrange for a professional roofer to inspect the stack.
Get home emergency cover with Hometree
Our home emergency cover includes unlimited repairs, an annual boiler service, zero parts & labour charges, and 24/7 claims support to keep your home warm. Subject to exclusions and T&Cs apply.
With no hidden fees and coverage across England, Scotland, and Wales, we’ve got you covered.
You can get covered today or contact us for a free quote.


We Beat or Match Any Quote
Phone us to beat or match British Gas or Homeserve quotes, Terms apply.

Serious About Service
24/7 claims support & rated Excellent on Trustpilot

Cover Match Guarantee
£50 gift card if we don’t cover something British Gas or Homeserve do, terms apply

All Gas Boilers Covered
All makes and models, regardless of age