How to Defrost a Freezer Properly

For centuries, British households relied on ‘ice boxes’ to keep food cold.
These were wooden cabinets cooled by a large block of ice, replenished by the iceman’s daily round.
The modern freezer appeared in the 1940s making it one of the newer electric kitchen appliances.
So, in less than a century, we went from wooden ice boxes to automatic frost-free cycles.
But we still often take them for granted!
However, one way to keep them working better and living longer is defrosting them, which:
- Increases storage space
- Stops drawers sticking
- Stops your freezer having to work harder (thereby saving electricity and lengthening your applaince’s lifespan.
Read on to find out how best to defrost your freezer.
How often you should defrost
You should defrost a manual-defrost whenever the ice build-up exceeds half a centimetre. So, about once every 6 months on average.
If you live in a wet or humid area, or if you open the door frequently, you will need to defrost more often.
Frost-free freezers don’t need defrosting
No, frost-free models do not require regular manual defrosting. They use an automatic cycle to melt ice build-up.
But like most appliances, they are not completely maintenance-free. You must still clean them once or twice a year.
And they can still ice up under certain conditions, e.g., failed door seals, defrost cycle malfunctions, blocked vents, etc.
How it takes to defrost a freezer
It takes between one and eight hours to defrost a freezer, depending on:
- The model
- Thickness of the ice (which usually correlates with how long since it was last defrosted)
- The method you use.
Defrosting a freezer: Step-by-step
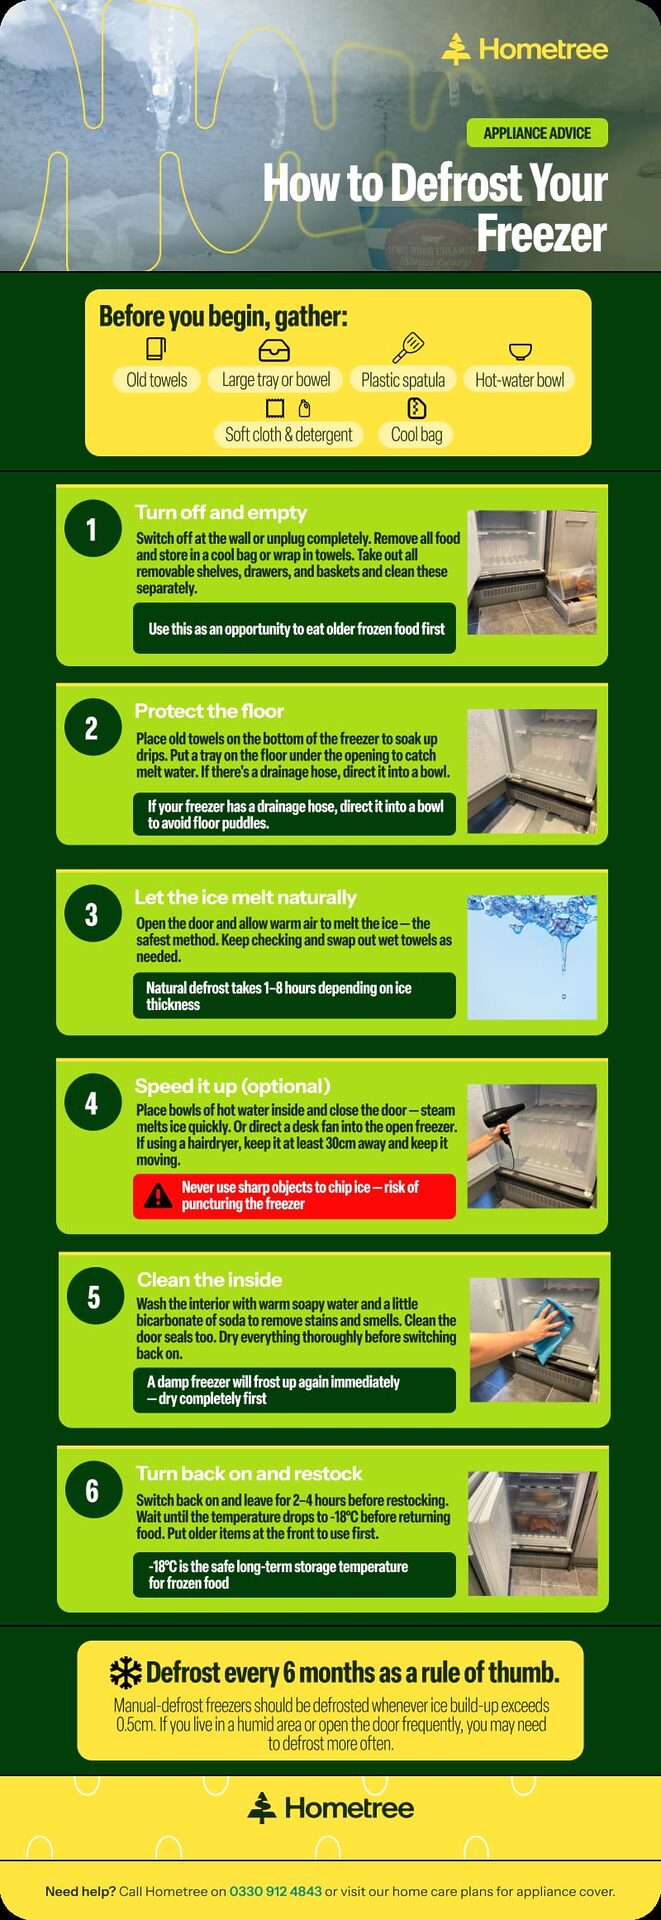
What you’ll need
To start with, gather a few things you use on a daily basis:
- Old towels or cloths
- A large water tray or bowl
- A plastic spatula or scraper
- A hot-water bowl
- Soft cloth and mild detergent
- A cool bag or insulated box (in which to briefly place your food)
Avoid using knives or sharp objects to scrape against the ice. These might damage the freezer and cause leaks.
Step 1: Turn off and drain the freezer
Start by turning off your freezer at the wall or unplugging it completely. If your freezer is connected to your fridge, you will have to turn both off.
Next, remove all the food. Put it in a cold box or wrap it in towels to keep it frozen so that you can continue with the defrosting process. Try and prioritise and eat frozen food if possible, before you start.
Once emptied, take out all the shelves, drawers, and baskets that are removable. Clean these separately while the freezer is defrosting.
Step 2: Protect the floor and collect water
As the ice melts, much of the water will be produced. Put old cloths or towels on the bottom of the freezer to soak up the drips. Or, put a tray or shallow pan on the floor under the opening to collect the melt water.
If your freezer has a drainage hose or hole, make sure it’s directed into a bowl or tray to catch the flow.
Step 3: Let the ice melt naturally
The best method to defrost your freezer is by letting the ice melt naturally. Simply open the door and allow warm air to melt it.
Depending on how much ice there is, this may take hours. Keep checking on it and changing out wet towels as needed.
If you want to accelerate things, you can try one of the following steps.
Step 4: Accelerate the defrost process
If you let the ice melt naturally, the process will take several hours. But you can speed up the melting process safely using these simple techniques:
- Hot water bowls: Place bowls of hot water inside the empty freezer and close the door. The steam will melt the ice rapidly.
- A desk fan: Place a fan to blow warm room-temperature air directly into the open freezer. This melts the ice quickly.
- A hairdryer: Blow warm air from at least 30 centimetres away, keeping the nozzle moving constantly to avoid damaging the plastic walls.
Step 5: Clean the inside of the freezer
Once all the ice has melted, wash the inside with warm soapy water. Water with a small dose of bicarbonate of soda will work well to eliminate stains and smell.
Wash the door seals too, for they can carry dirt and moisture. Wash using a gentle cloth, rinse in clean water, and dry the entire thing well.
First, ensure the freezer is dry before turning it back on. This avoids new frost from building immediately.
Step 6: Turn it back on and stock it up
Turn the freezer back on and plug it in. Let it be chilled for a minimum of 2 – 4 hours before stocking up with food again.
Ensure that the temperature drops to about -18°C, the best to store food frozen safely.
After freezing, return your food to the freezer. Use this opportunity to sort things out, such as old food towards the front so that you use it up first.
Ways to prevent ice build-up in freezers
It defrosts over time, so it pays to leave your freezer frost-free as long as possible. Here are easy tips:
- Leave the door closed: Every time you open it, warm air enters and is converted into frost.
- Check the door seal: Loose or cracked, and cold air will seep out, and ice will freeze quicker.
- Chill food before freezing: Warm food adds moisture and can cause frost to develop.
- Don’t pack too tightly: Air needs to circulate around the food so it can cool evenly.
- Defrost occasionally: A little cleaning every few months stops frost from re-building.
These habits keep your freezer in good working condition and save you from having to perform frequent deep defrosts.
Why is my freezer icing up?
Excessive frost occurs when warm, moist air enters the freezer and condenses on the cold walls and shelves.
Here are the most common causes of rapid ice build-up:
- Damaged door seals: Loose, cracked, or degraded magnetic seals let warm room air leak inside constantly
- Overpacking the shelves: Blocking internal vents prevents proper air circulation, trapping humidity in pockets
- Hot food storage: Placing warm leftovers directly into the freezer releases moisture and causes frost to develop
- Leaving the door open: Leaving the door open or opening it too frequently lets a large volume of humid air inside.
To test your seal, close the door on a sheet of paper. If the paper slips out easily, your door seal needs to be replaced.
Defrosting a chest freezer
Chest freezers are manual-defrost by design and lack automatic frost-free cycles. Because they hold a large volume of food, defrosting them requires careful planning.
- Store food securely: Pack frozen items into cool bags or wrap them tightly in thick towels. Food stays frozen if kept insulated in cool bags or wrapped in towels.
- Protect your floor: Lay down old towels or shallow pans around the base of the freezer. Chest freezers lack vertical doors, meaning water can pool quickly.
- Manage the drainage: If your freezer has a drainage hose, direct it straight into a bowl or tray. If there is no hose, use a plastic spatula to scoop out the melting ice chunks manually.
- Clean and dry: Wash the interior walls with warm soapy water and bicarbonate of soda to eliminate musty smells and stains. Wipe the entire unit completely dry before turning it back on to prevent new frost from building immediately.
How to defrost a freezer without turning it off
You can defrost a freezer without turning it off, but you must work extremely quickly to prevent your food from thawing. If you choose this method, follow these strict steps:
- Isolate the food: Move all frozen items into cool bags or wrap them in towels immediately.
- Use targeted heat: Place bowls of hot water on the shelves and close the door briefly. The steam will make the ice.
When to get professional help
If your freezer is icing up too quickly or won’t hold cold temperatures after defrosting, it may have a problem with the door seal or thermostat.
In the event that you notice water buildup within, banging sounds, or temperature fluctuations, you should call a professional engineer. It can be checked and repaired safely by an expert.
Get your home appliances covered with Hometree
Our home appliance cover includes unlimited repairs, an annual boiler service, zero parts & labour charges, and 24/7 claims support to keep your home warm. Subject to exclusions and T&Cs apply.
With no hidden fees and coverage across England, Scotland, and Wales, we’ve got you covered.
You can get covered today or contact us for a free quote.


Get a free appliance cover quote

We Beat or Match Any Quote
Phone us to beat or match British Gas or Homeserve quotes, Terms apply.

Serious About Service
24/7 claims support & rated Excellent on Trustpilot

Cover Match Guarantee
£50 gift card if we don’t cover something British Gas or Homeserve do, terms apply

All Gas Boilers Covered
All makes and models, regardless of age